|
NO WAR IN
UKRAINE!
Home
Products
Skins gallery
Tutorials
Buy
Downloads
Demo-apps
Updates history
Feedback
Customers
Partners
Forum
Sign up for news
Windows 11
Compatible
|
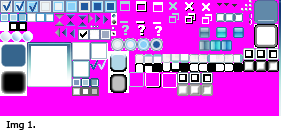
Skins creation. General informationOnly unpacked AlphaSkins may be loaded to the skin editor. For unpacking and loading of packed skin (*.asz) use the "Unpack and open" button in the ASkinEditor.exe. All skins in unpacked state contains two main files : So, for a new skin creation needed : 1) draw all parts of skin and put them in the MasterBitmap ("Master.bmp") or use existing; 2) configure a skin ("Options.dat") and create a packed skin file by using the ASkinEditor.exe program. MasterBitmap file
Content of the Master.bmp file extracted from WLM skin is shown on the Image 1.
MasterBitmap consists of many groups of different images of controls elements.
Pictures for each state must have identical size. So, a width of each group must be a multiple to the count of states supported by a control.
Image rendering
Preparing of a control image before showing on the screen is happens as follows: 1. Paint a background. 2. Paint a border. 3. Paint a control content.
So, when the work is finished on background, images of corners and borders will be inflicted on it from MasterBitmap.
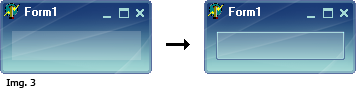
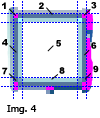
On the Image 3 is shown the ToolBar control before and after painting the borders. At painting borders, the source image is cut on 9 parts (see image at left). The parts 1, 3, 7 and 9 (corners) are moved as is, sides of border is filling by stretching (parts 2, 4, 6 and 8). The center is filled by 5 part, if it is defined in section parametrs (if this filling is not set then painting goes is more faster usually). Coordinates of skin parts, widths of borders and many other parameters may be defined in the skin editor. MasksOne of unique feature of AlphaSkins is masks which used when needed to paint various elements. This feature is a great advantage when needed draw controls with antialiasing or partial translucence or other effects. Masks in AlphaSkins emulates an Alpha-channel. For a mask creation should be added additional image which size equals to size of main image. Mask image should be placed under a main image and can have only gray tones. When pixel is darker, it will be lose transparent on the result image accordingly. If pixel has mask with white color, it will be fully transparent. If pixel has mask with black color, it will be fully visible.  At this sample are shown borders of button from WLM skin and complete view of this button after setting a mask. Background with gradient is drawn before painting of masked borders there. Fuchsia pixels which are placed in corners at the main image will be fully transparent on the result picture. |
|
Installing, using and licensing the demo programs
© Sergii Goncharov, Ukraine, Odessa 2004-2023
| |
 Each group contains image of associated control for all control states :
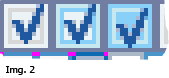 Sample of the "CheckBox" control images in three states is shown on the image 2. Three pictures of different states of this control is glued into one. First picture - for default state. Second picture - for selected/active/hovered state. Third picture - for pushed state. Count of states of images doesn't necessarily be equal to 4 states. For example: you can need only two images, because you don't need draw a new picture for pushed state if it equals to the picture in activated state. Example 2, when you need only one image, because control can have only one state, or all it state images is equals to self in all states of control. Preparing images for such controls as forms, buttons and etc. isn't so difficult.
 background may be semi-transparent, filled by evenly color or gradient or texture or all at once (all this settings may be configured in ASkinEDitor and it will be detailed later).
 If control image have a pixels with "Fuchsia" color in corners then these pixels will be transparent. Control can't have such transparent pixels in borders for optimizing of rendering. If transparent pizels are needed in a control borders then masks may be used for this purpose. Borders may be drawn by repeating or stretching of part of the source (mode of drawing may be selected in editor).